Connect a Studio project
Hook Insites Studio up to one or more Insites instances you already manage.
If you already run Insites instances through Console, Connect is the right on-ramp. It bridges Studio to those instances — no migration, no rebuild — so you can edit them in the browser with AI assistance.
When to use this
Use Connect when:
- You have a working Console-managed Insites instance.
- You want to start editing it in Studio with AI support.
- You're not changing the underlying platform — you just want a better editor.
If you're bringing a non-Insites site over, use Migrate instead.
Before you start
You need:
- Workspace access with at least Studio tier.
- One or more Insites instances visible in your Console.
- Optionally, a target Studio project to attach to (if you've already started one).
The flow takes around 5–10 minutes for one instance. Multi-instance setups (Dev + Staging + Prod) take a little longer because you map each one to its environment.
Steps
Open the Connect flow
From the workspace dashboard, click New project → Connect.
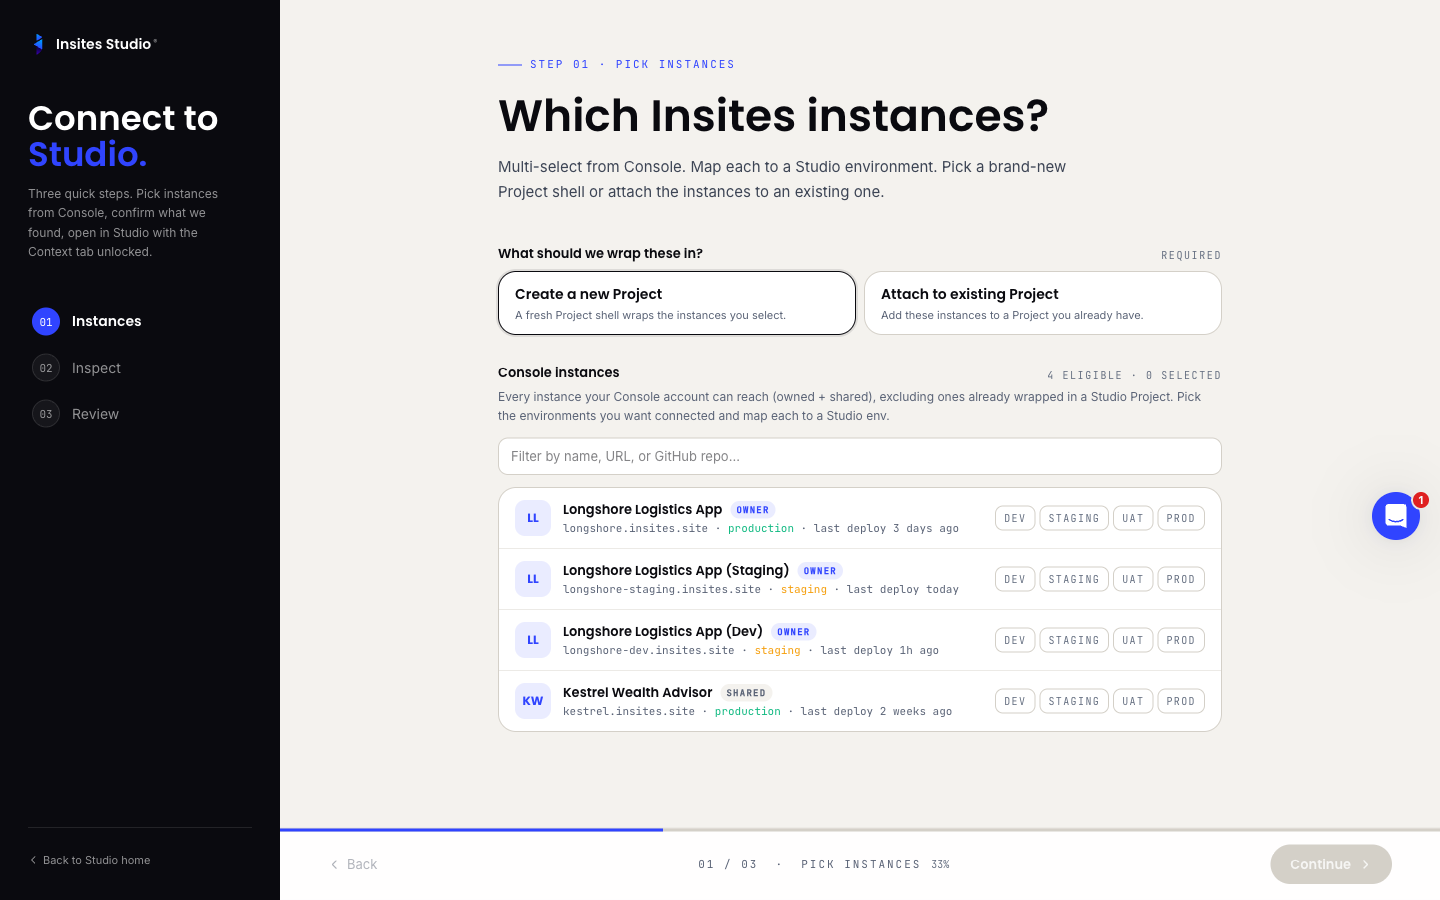
Step 1 — Pick instances
Studio lists every Console instance available to your workspace, filterable by name, URL, or GitHub repo.
Tick the instances you want this Studio project to manage. Most teams pick all environments for one product (Dev, Staging, UAT, Prod); some pick only the production instance to start.
For each selected instance, choose its Studio environment:
- Dev — first deploy target, fast iteration.
- Staging — pre-production validation.
- UAT — user-acceptance testing (optional).
- Prod — the live customer-facing instance.
- Skip — selected but not assigned an environment yet.
Then choose the target:
- Create new project — one fresh Studio project mapped to the selected instances.
- Attach to existing project — pick from the dropdown of your workspace's existing projects.
At least one instance must be selected, and the target choice must be made.
Step 2 — Inspect
Studio reads metadata from each selected instance:
- UUID.
- Connected GitHub repo.
- Member count.
- Data records (counts by type — pages, products, contacts, etc., depending on the modules in use).
The instance-to-environment mapping is shown for your final check. If a Console-typed instance is mapped to the wrong Studio environment, this is the place to fix it.
Step 3 — Review
A summary screen with:
- Project name (auto-derived from the instance names, editable if you're creating new; locked if you're attaching to an existing project).
- Stats card: instance count, prod/staging split, GitHub repos, total members.
- Ready confirmation.
Click Open in Studio.
Land in the editor
The editor opens with the project loaded. The file tree reflects the connected GitHub repo. The preview pane shows the live instance.
Unlike Build with AI or Migrate, there is no AI-generated scaffold. The project is exactly what was already on the connected instance.
Make your first edit
Pick a file — a partial, a page, anything. Edit it directly or prompt the AI: "Add a hero section to the homepage." Patches stage as usual; review and accept.
Deploy to Dev first
Even when you're connecting to a live Prod instance, your first deploy should target Dev or Staging. It validates the GitHub commit and CloudShell deploy plumbing before anything reaches customers.
From the project home, open the per-instance action menu on Dev → Deploy here.
Promote to higher environments
Once Dev looks right, promote up the chain. The per-instance menu on each environment row has Promote to next instance, which copies the deploy artefact forward without rebuilding.
A note on multi-instance projects
A single Studio project can target multiple instances — that's the point. The same files, deployed to different environments, with promote between them.
What this means in practice:
- Your team agrees on environment hygiene: Dev is for in-progress work, Staging is for QA, Prod is what customers see.
- Studio surfaces these as instance rows on the project home, each with its own status and deploy menu.
- Activity and member changes are project-level, not per-environment.
Common questions
Can I connect a project that another teammate is already in? Yes, if you both have project access. Liveblocks gives you live-cursor multiplayer in any file you both open.
What if my instances aren't all in the same workspace? Studio is workspace-scoped. Move the instances into one workspace through Console first, then Connect from there.
Will Connect modify my live instances? No. Connect is read-only until you Deploy. Your instances stay exactly as they were.